

Setting up your Pinterest account to represent your business has so many benefits that it makes it quite difficult to ignore. If you’re using Pinterest and you own a small business, please consider verifying your website through your Pinterest account and getting it set up as a business page. You won’t regret it, and it isn’t nearly as complicated as you might think! If you don’t already have the All in One SEO plugin for WordPress please take a moment to download and activate the plugin in your WordPress Dashboard. Once you’re done with this, come back and finish the remaining steps. All in One SEO helps to make verification steps go much smoother and using this plugin will eliminate the need for copying and pasting code!
Today we’re going to take some time to talk about how you can verify your website through your Pinterest account using the All in One SEO plugin for WordPress. Verifying your website has several benefits:
- You’re setting yourself up for more traffic and engagement on your website
- It helps to boost your SEO
- You’re now allowing yourself more options for visibility and reaching your target market
- It generates trust because your Pinned images and videos are now automatically supported by your content and authorship
Now that we’ve briefly talked about WHY it’s important to verify your website through Pinterest, let’s go through a few steps to get you set up.

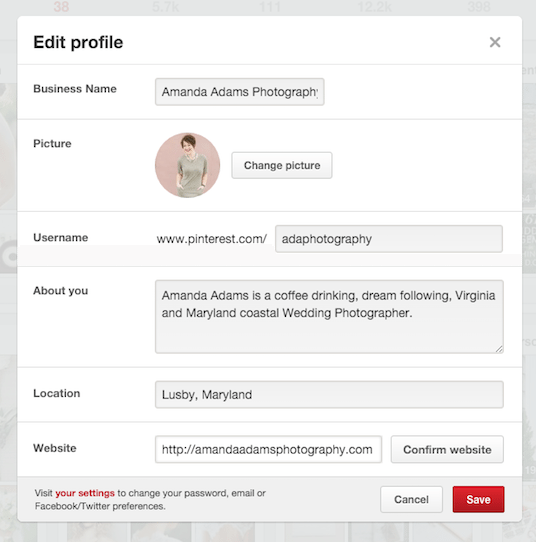
- Log in to your Pinterest account and locate the Edit Profile button at the top right of your page’s screen.

2. An option box will pop up in the middle of your screen. Locate the box to type in your website. Here, you will type in your URL and click Confirm Website.

3. Highlight the set of numbers/letters you see in the image above. DO NOT include the quotation marks in your highlighted text. This series of characters is what you’ll use to drop into the All in One SEO plugin to verify your website through Pinterest. Copy this text. Click Finish.

4. Now you will need to open your WordPress Dashboard. Locate All in One SEO in the left navigation bar. Click on General Settings and scroll to the bottom of the page until you locate the Webmaster Verification box, shown above. You will then paste the series of text you copied from your Pinterest page into the Pinterest Site Verification box. Then, scroll to the very bottom of this page and click Update Options to accept the changes you just made.

5. Now that your code has been put into the All in One SEO plugin and your changes have been saved, go back to your Pinterest page to confirm your website. You may need to refresh your page if you don’t notice the acceptance right away. Congratulations!! You’re now confirmed!
From this point on, any pinned image you share on Pinterest from your website will include a direct link back to your site, a listing of YOU as the author, a copy of your Pinterest profile picture attached to the pin, and the name of your business at the top of the pin. (Your pins should be showing up in a way that is similar to the image below.) Verifying your website through Pinterest this way is extremely easy to do and shouldn’t take long at all!

If you found this blog post helpful in getting you started with creating trust and authorship with your Pinterest pins, please let me know below! I’d love to hear from you!! Happy pinning!!


")


